Garters to hold up your Hosen.
(no sewing needed!)
Forget the wedding garters that are just there for show… in Medieval times, people really needed them to hold up their hosen!
Until the late 16th Century, and even later, most people couldn't afford the expensive knitted silk stockings available to only the richest members of society.
Instead, they wore "hose" or "hosen" made of linen or wool, fitted moderately closely to their legs and cut on the bias (diagonally across the fabric). These had a tendency to creep down into your shoes, if you weren't wearing garters!
It was incredibly uncomfortable (take it from someone who has tried!)
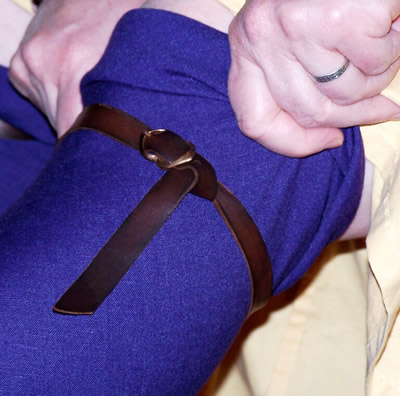
The simple solution was to make a pair of soft leather garters. These were usually made using a small, but strong, bronze buckle, and narrow length of leather simply looped over the tongue and shank. Holes were punched at the other end, just like the notches on a belt.
How to make them.
This is truly one of the simplest projects you can make to add to your historical costume accessories.
You will need
- 2 x small buckles (1-1.5cm wide at the bar), preferably bronze, not pewter.
- 2 lengths of thin, soft leather, cut to the same width as the buckle bars, and approx. 10cm longer than the measurement of your calf, just below the knee.
- A craft knife
- a leather punch or awl to make holes for the buckle tongue to go through.
- Leather dye and and leather conditioner or oil (eg Neatsfoot Oil)
Instructions
- At one end of each leather strap, starting approx. 1cm from the end, cut a slit along the strap, approx. 3cm long and the same width as the tongue of your buckle.
- At the other end of each leather strap, cut the end diagonally into a point to make it easier to put through the buckle.
- Taking the flat end of the leather with the slit in your hand, pull the end through the buckle from the front to the back.
- Fold the end of the leather, around the buckle bar and to the back of the buckle, inserting the buckle tongue through the slit.
- Insert the pointed end of the strap through the slit near the buckle, from back to front.
- Pull strap through the slit, and tighten the loop you have created around the bar of the buckle.
- Put garter on your leg, just below the knee and <em>over</em> your trousers or hosen. Use this as a guide to mark and punch a hole for the buckle tongue to go through and fasten it. Punch another hole on either side of the original hole, approx. 2cm from the first.
- Apply leather dye in your choice of colour, and leave until it is thoroughly dry (this will depend on your climate and weather conditions)
- Apply leather conditioner to the dry leather to soften and preserve it, following the manufacturer's instructions. Repeat this process every 6-12 months to make your leather last for years and years!
Decorating your garters
Many leather garters seen in paintings have been decorated with stamped designs, hand-tooled lettering, and painted with leather paints, just like the one on the statue below.
You can do this too, if you're so inclined. Just do a little research to find out what designs are appropriate for your period costume.

Alternative methods.
There are lots of examples of garters which have been woven, instead of being made from leather. These were often tablet-woven from fine coloured silks, with patterns, lettering, or even heraldic imagery in the design.
If you have the skill or the interest to make this style of strap, they're still fairly simple to assemble.
The simplest finishing for the raw ends of the weaving was to bind the ends with stitching. Still more ornate was the put a metal strap-end on the braid at the end opposite the buckle, and finish the flat end (the bit to be stitched down over the bar of the buckle) with a similar strip of metal wrapped around and firmly riveted in place.
Here's a lovely example of a tablet woven style based on Museum of London Finds.
Further decoration could be added with beads, pearls, metal plaques or even gemstones.
Unlike the leather assembly technique, you can simply fold the braid through the buckle, allowing the tongue of the buckle to poke through the weaving. Sew the end of the braid down on the inside of the strap (at the back of the tongue). If you're using metal tipping at both ends of the braid, you could stitch it to the outside to form another decorative feature.
Wearing them
Buckle the straps firmly just below the knees to stop fabric creep. Don't let them tourniquet your circulation, but make sure your fabric doesn't slip down too much.
Show us your legs!
We'd love to see some of the wonderful examples of garters (especially the ornate ones) made by our readers. Please join in and inspire us with your creativity. You can ask questions, or share your photos using the form below, and tell us a little about the design and historical context, to boot!
Do you have a question about this Topic?
If you have a question, or you're stuck, we welcome questions, so feel free to ask!
You can even add a photo to illustrate your problem if you like.
Return from Medieval Garters to No Sew Projects.
New! Comments
Have your say about what you just read! Leave me a comment in the box below.