Re-Creating a 1918 Girl Guide Uniform
1st September 2016
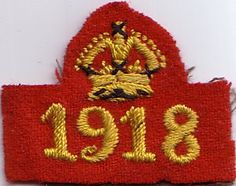
Since I returned to Girl Guiding in 2013, and picked up the wonderful book, "How the Girl Guides Won the War", I have been wanting to re-create a replica of the 1918 style Girl Guide uniform worn by Guides serving as messengers at the signing of the Treaty of Versailles. Each of these young women held the highest award possible for the time, the All-Round Cords, and could be relied upon to be swift and accurate with their deliveries.

Three years later, this project finds me studying my Master of Creative Practice, with the School of Communication and Creative Industries at Charles Sturt University. Never would I have believed my curiosity would take me this far!
For the final practicum of my First Year, it is up to me to actually re-create this historic Girl Guide uniform, bringing it to life for the first time in nearly 100 years.
In order to show the uniform off at its very best, I have decided to make her a very experienced Girl Guide, much the same as those girls in the picture.
She will be a First Class Ranger Guide (over 16 years of age), with All Round Cords, and also a Patrol Leader with her unit. For choice of Patrol Emblem, I wanted her to be a bit of a suffragette, using the colours violet and green for her shoulder knot. Leslie's Guiding History page listing patrol emblems told me that in 1918, she would have been a member of Thistle Patrol.
I originally thought it would be a good idea to make her a recipient of the Gold Cord Award, but more recent research with Leslie Smith's personal help (scanning pages from her collection of old manuals), shows that this did not become available until the publication of the 1921 "Policy, Organisation & Rules" (PO&R for short). Back to All Round Cords it was!
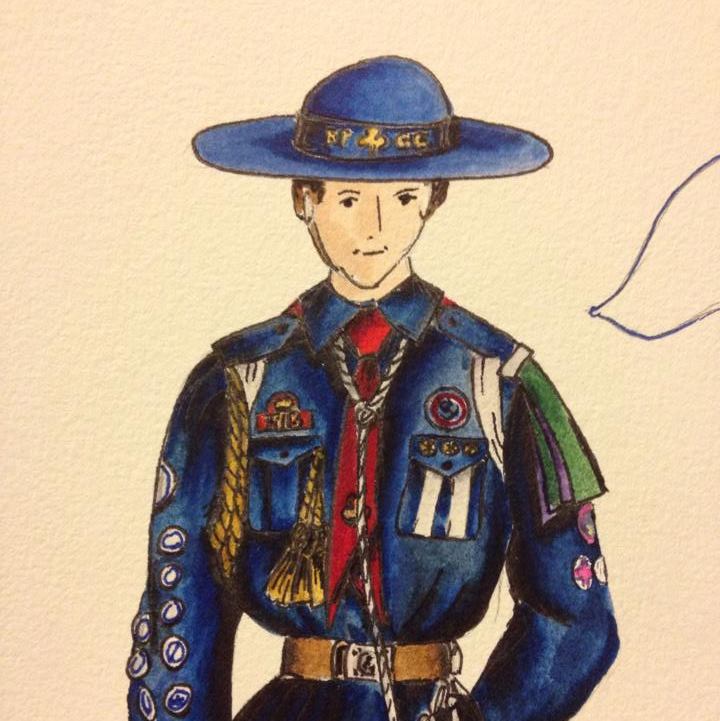
My original drawing (above), was done before I was able to cross-check period sources for accuracy to 1918. Until this point, I was relying on photographs and captions found online. I was also using a combination of the 1912 manual, and the 1936 as my primary references... So there are several inaccuracies:
- Gold Cords were not available as an award in 1918
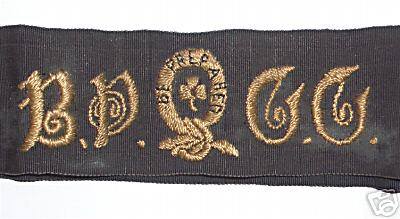
- The lettering, "BP GG" had been phased out on the hat band a year or two previously, to be replaced by the Trefoil inside the ribbon emblem, and the letters "GG" flanking it.
- The title tape is the wrong colour.
- The tie (made from a triangular bandage styled scarf) was settled into the set colour of "Saxe Blue" (as described in later PO&Rs) or light blue by 1918.
- Rank was still being denoted by chevrons on the sleeves, not by stripes on the pocket (although this appears to have been changing at a grass-roots level, if not in official publications).
- The Red Cross satchel (white straps on shoulder) had, by 1918, been ditched as a standard piece of uniform for everyday-wear.


The book "Girl Guiding" (Baden-Powell, Robert. 1918) states that All Round Cords on a Girl Guide uniform "May be worn by any Guide having passed the 1st Class, and and other seven tests, in addition to the three included in the 1st Class."
Working backwards, I then needed to work out what the requirements for 2nd and First Class were at that time, with the result being that (with more scans from Leslie, and her 1918 copy of Girl Guiding) a First Class Guide needed to hold the Cook, Needlewoman, and either Sick Nurse or Child Nurse.
Of course, very few Guides would only have earned the badges for First Class. Reading over the requirements for the award, I was able to list several others, partly covered by the First Class requirements, which could also be added to the designs to be worn in the final uniform. After all: if you're going to do half the badge to get there, why not complete the tasks?
My next task was to begin drawing badges to scale, but more on that tomorrow.
2nd September 2016 - Sketches
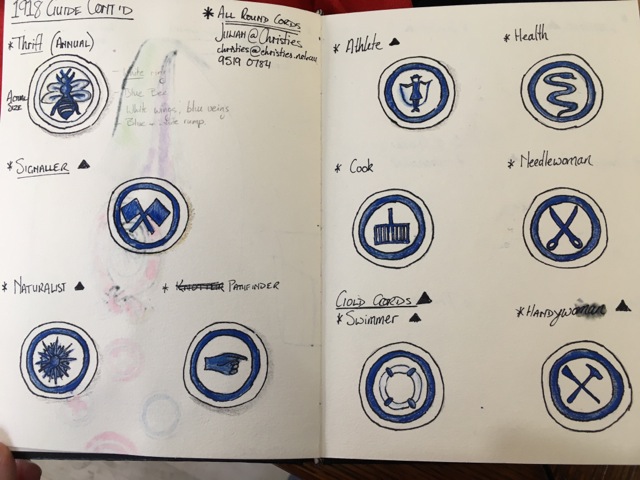
Using my handbooks from 1912, and 1932, I carefully read through badge requirements for Second Class, First Class, and All Round Cords, sketching as I went.
About halfway through this process, the copies of the syllabus from the 1918 edition of "Girl Guiding" arrived, thanks to Leslie, and need to change a few things. I'll get back onto this task and weed out any incorrect badges a little later, but here are my drawings so far:
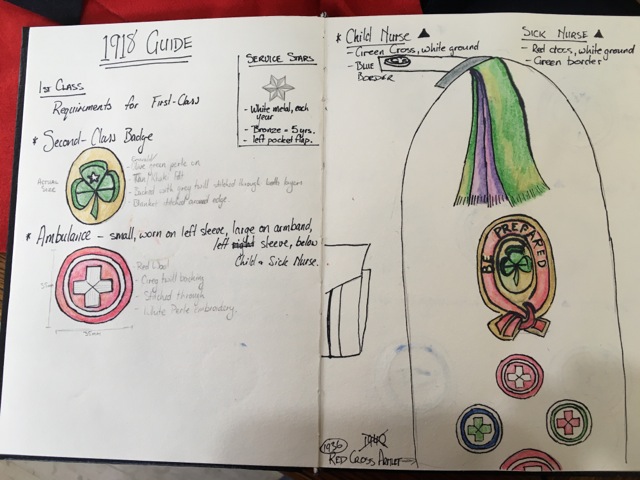
It also occurred to me that I might be labouring under the misapprehension that my colours for the Cross badges were correct. So I asked poor Leslie again...
They were not. The white on Red is not the Ambulance badge. Ambulance is the Red Cross with the Green ring. White Cross and ring on a red ground is actually the Sick Nurse Badge. And the Child Nurse (correctly) is the green cross with a blue ring.
I really need a copy of the "Consolidated Catalogue"...
3rd September 2016 - Kit List
I took time out from my market this morning to write up a Kit List for my complete 1918 Girl Guide uniform. This is what I came up with, along with the materials needed:
- Army-style Shirt (navy blue wool serge, two pleats at shoulders, two pleated breast pockets, button epaulettes)
- 1918 Walking Skirt (navy wool serge, black linen lining.)
- 1918 Bloomers (navy wool serge)
- Black Stockings or tights (wool blend)
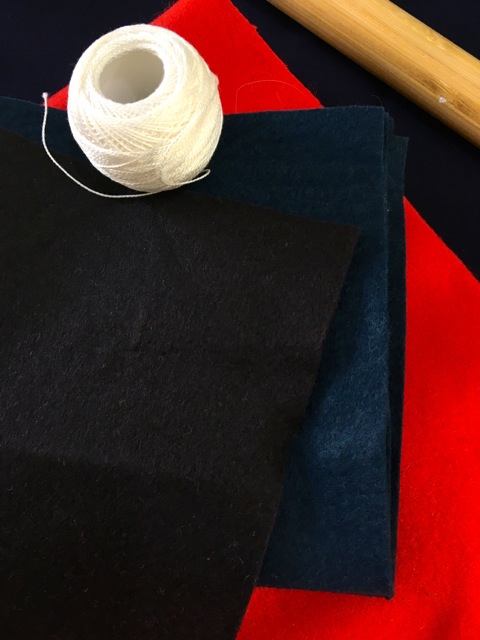
- Wool felt in white (proficiency badges), black (patrol emblem), beige (Second and First Class badges)
- Wool melton in red (1918 War Service Badge)
- Sky/Saxe Blue heavy cotton evenweave triangular bandage
- Title Tape - white text on black tape. Talk to my old friends at ClothingLabels4U.com
- Cotton Tape, 10mm wide. White. For Patrol Leaders Stripes or Chevrons.
- DMC Cotton Perle or wool (or silk) threads in: Red/Emerald Green (1st Class), White/Yellow/Black (1918 War Service Badge and Sick Nurse Badge/Red Cross Armlet), Navy Blue (Proficiency badges), Lilac/Purple/Forest/Olive (Thistle Patrol Emblem), Golden yellow (GG Emblem on hat band.
- 1914-18 pattern tenderfoot badge (x 2 for a Patrol Leader)
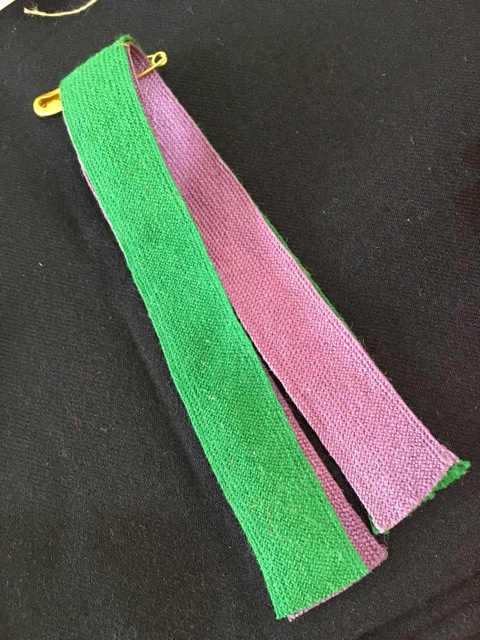
- Shoulder knot for Thistle Patrol. Wool twill tape in Green and Violet, stitched over a brass safety pin.
- Black buttons (shirt, skirt and bloomers)
- White Canvas (Red Cross rucksack, flag hoist).
- Navy blue wool felt capeline milliners base, navy milliners grosgrain, hat size/stiffener. Black gabardine lining/size adjuster, and leather strap and buckle (Guide Hat). Talk to Hatters Millinery Supplies
- Broom stick with long handle for staff
- White cotton or calico (Patrol Flag)
- All Round Cords. Talk to Christies
- White cord for making lanyard.
- Traditionally -stitched Union Jack (preferable) or Australian Flag, parade flagpole to fit Trefoil Topper.
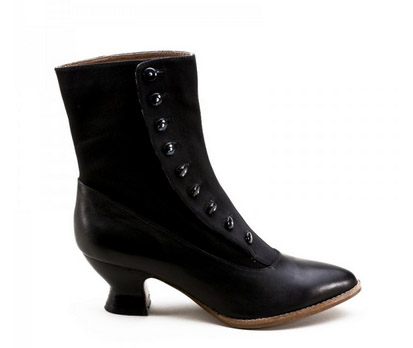
- Boots. OMG the boots. These ones. Don't think I can afford them right now but I want them, because they are so perfect:
5th September 2016 - Gathering Supplies
I needed to check through and collate all the materials I already have for the 1918 Girl Guide uniform, so I can begin work. Then I can buy anything else I might need to complete the outfit.
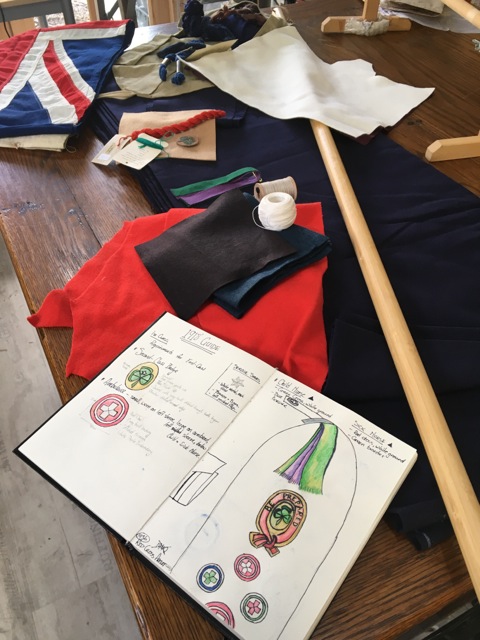
I initially had some difficulty finding perle thread for the embroidery, but descriptions in manuals said the ribbon of the First Class was done in silk, and I've seen several badges sewn in wool perle as an alternative to cotton.
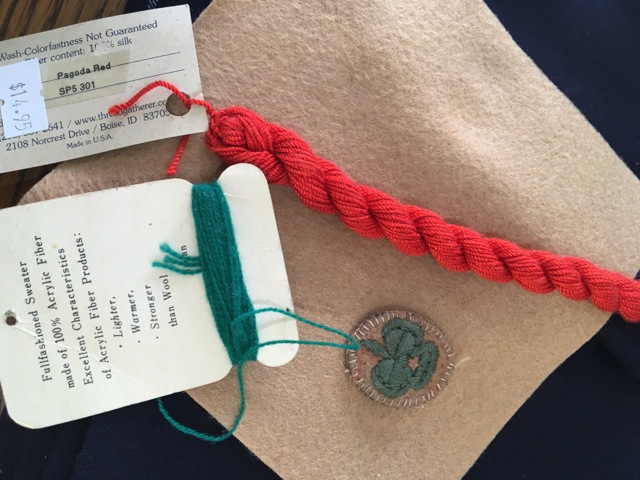
I discovered the perfect wool felt in a little Aladdin's cave of a shop in Bathurst, along with the perfectly-coloured, slightly terrifyingly-priced red silk for the ribbon around the First Class badge.
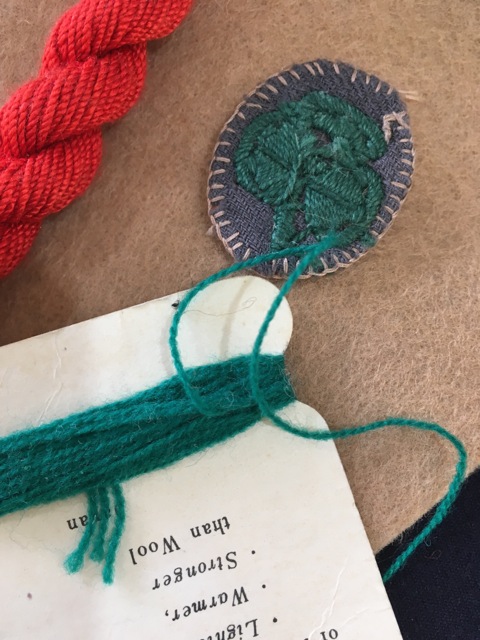
The little card of emerald green wool was found in my Granddad's old Air Force Sewing kit when I went looking for the spare fabric (which has gone missing...). Turn the badge (and original 1918 example I bought off eBay) over, and it's a near-perfect match, though not as shiny.
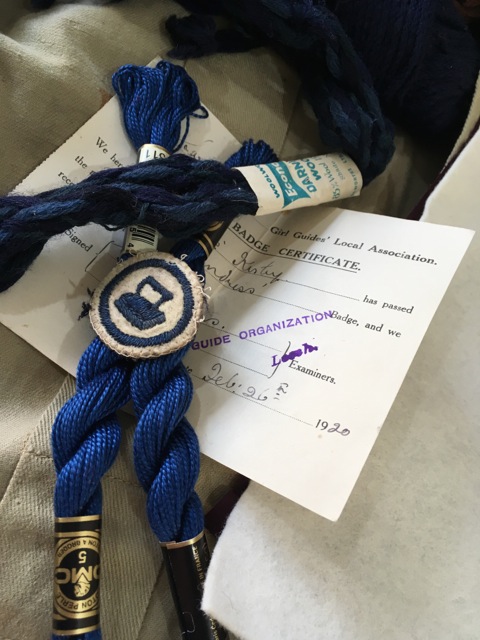
Another of my prized possessions is my 1920 Laundress badge and certificate on the early white felt. Shown below, with the felt on the right, blue cotton perle underneath, and the possibility of a darker wool from Granddad's darning kit (sitting underneath the lot).
I also came by the perfect black felt for the Patrol Emblem, navy for my daughter's Brownie project (another long story...), and the red wool melton offcuts from an old client's order. The white perle literally hit me, when the box fell off the top of the craft cupboard!
I also found the correct wool twill, in appropriate colours for Thistle Patrol, in my stash. It just needs to be stitched around the pin:
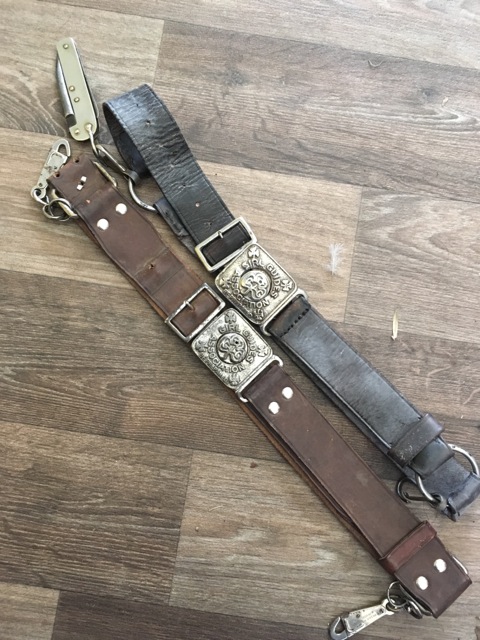
A lengthy discussion was had about these two belts in my personal collection. I can't take them apart. They've survived too long, and are also too small for my waist. The buckles are all the post 1924 Pattern, alas, so too late for this uniform. I've asked Husband to work up a replica.
6th September 2016 - Bloomers!
Just as an aside to my previous comment about the rucksack being deleted from the Girl Guide uniform by 1918... Today's research has turned up a number of dated 1918 photos showing Guides still wearing them. One (below) shows them pulling the Queen in a carriage, and therefore pretty strict and official on uniform code. So the rucksack stays.
 Girl Guide uniform showing rucksack, and girls pulling Queen Alexandra, 1918.(image courtesy eBay)
Having gathered the basics of my materials, today's efforts turned to nailing the right patterns for the style. There was clearly no one single pattern in 1918. The shirts were pretty standard (a few variations in collar for girls "making do"), but the skirts vary enormously. A generic 3/4 length walking skirt of the time will do perfectly. I've got a slightly longer pattern from a decade earlier, which will fit the profile, with adjustment, or the following 1918 example which matches (Click on image to follow link for instructions):
 Girl Guide Uniforms with miscellaneous skirts c1917.
 Girl Guide suitable gored skirt pattern, 1918.
Next, my attention turned to underpinnings, the well-dressed Girl Guide needing (at least potentially) a basic corset of the period if she was over 16, and the regulation bloomers.
What were "regulation" bloomers in 1918? We have a couple of much later, shorter examples in the Girl Guides NSW/ACT Uniform Archive, but nothing so early, so I turned to Pinterest, and found several examples which would work:


And I just couldn't resist showing you all this wonderfully practical pic of Girl Scouts in the USA, about to go hiking in Jodhpurs, in 1918:

I've discussed with my corsetier, and I don't think I'll have time to make the correct corset during the assessment period. I did, however, find the perfect thing for a modern girl of 1918 to wear, in the form of this elasticated corset from Lithgow's own Berlei factory!

7th September 2016 - Setting up for embroidery.
Now that I have the basic colours and felts that I need for my badges, today's exercise was to dig out a frame (not a hoop... it stretches felt badly), and stretch mount the felt to the appropriate backing fabric.
I could have sworn I set aside some WWII vintage cotton twill for this very purpose, among my grandfather's stash of things, but I couldn't find it anywhere. While looking, though, I found a handy alternative, in the vein of "making do" just like a Girl Guide:
 A sketch by my grandfather, and the thick cotton fabric once used to cover airplane substructure.
I found a bag, containing a pen sketch done by my Grandfather while he was a postmaster for the 4 Squadron RAAF Army Co-op in New Guinea in 1944. Along with it, was a quantity of the same fabric the drawing was done on, and a note, in his handwriting, saying that it was "Airplane fabric for drawing on etc".
The textile is natural cotton, and about the right weight for the backing. While I digress from my task by showing off family history (It's a very cool drawing), I can't think of a more appropriate use for this carefully-kept, 70-year-old fabric, than to use some in my masters. There will still be plenty left for drawing, should the mood take me!
The next step was to stetch my backing fabric on my tapestry frame:
 Start by fitting each end of your backing fabric to the top and bottom bars of a tapestry frame.
 Roll top and bottom bars outwards until fabric is strung taught between, and tighten wing nuts.
The process of keeping the felts flat on their backing involves loosely tacking the pieces down with straight lines or a grid pattern. I chose a grid to guide my proficiency badges (white), and left room for the Second and First Class badges between my rows on the beige felt. Because of the size of my red wool melton piece, I tacked around the edges, but if it shifts, I can always add more later.
 Method of mounting felt (or any textile) to a backing prior to embroidery.
 Four felt pieces tacked to backing fabric, stretched flat.
8th September 2016 - Conundrums
More delving into Leslie's scans from "Girl Guiding" (1918 handbook) as they arrive in my inbox... and now we're turning up information that's confusing not just me, but the British Archivists over at "I Love GirlGuiding History" as well.
You see there's this:
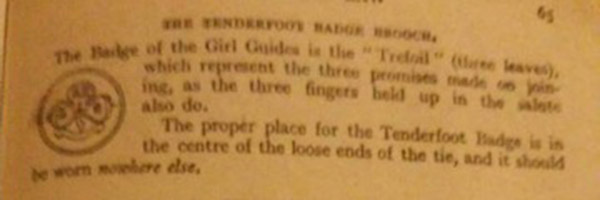
... which if you're not watching closely might just be an explanation of the brooch. Except that every handbook, before and after this one, shows the trefoil "Tenderfoot Brooch" without that ring around it.
Which brings me back to the following picture I stashed away in my Pinterest Board a while ago, marked "1918":

Wait... what? What are those rings around the badges on these girls' ties?
We're all a bit stumped.
I've got a badge that is supposed to be 1914-18 (some people say 1920) vintage in my own collection. It doesn't have a ring.
In fact, aside from this, and a couple of other contemporary pictures, nobody I've spoken to has ever seen the pictured version of the badge in real life. At least, they've never seen one with a metal ring around it.
Yet every other illustration shows all of the metal badge. And there is no explanation of the ring being anything other than metal (or enamelled metal, if it's that dark against the brass of the regular trefoil). This is something that needs to be tracked back through the Girl Guide Gazette of 1918, and possibly further back until we find some instructions (which were fairly common, but again, no-one's spotted a reference just yet).
Speculation is now running, to it being some sort of felt backing piece. If that's the case, it might have a coloured ring. Might it be an early attempt at colour-coding the Sections, prior to the trefoil iteself being coloured in the familiar shades of Red (Ranger), Royal Blue (Sea Ranger), White (Cadet), and later Sky Blue (Air Ranger)?
We just don't know.
Actually, there's a lot going on in this picture, from a costume historian's point of view:
It shows a range of collars. It also shows young women wearing shirts, "overall" dresses, and skirts in a mix which approximates the official published illustrations of the time, without ever quite matching them.
Most of the girls, including Captain, are wearing a War Service badge on the right breast. It's probably for 1917, because there is no bright yellow Crown in evidence, as in the pic below:
There are three or four different versions of the hat band being worn here, too. One has no lettering. Captain's appears to have a buckle, despite seven years of service (she hasn't replaced her first five silver Service Stars with the regulation Bronze Service Star for five years, either. My Guide will do it "by the book" - more on that later). There could also be two different versions of the BP @ GG design on the bands, one plainer (back row is a bit blurry, so it's really hard to tell), and the other more ornate, like the picture sent to me recently by a collector when I asked if anyone had a pic of this design (below). I love this design, BTW, so I am happy to have an excuse to use it, after I thought it was an extremely early example. It may be the only example after all. The girl wearing it seems to have been around since 1913, though, which is about when I intend to have my hypothetical Girl Guide join.
And with those musings... I'm off to bed. I'm planning to continue setting up the embroidery tomorrow.
9th September 2016 - Answers!
My enquiries were rewarded with more scans, this time from self-confessed "Kentwellie" (if you're into Tudor re-enacting, you'll have heard of Kentwell Hall in the UK), Amanda Kerr-Munslow.
Apologies for the blurry snap, but this confirms what I suspected: That the ring around the badge is an early attempt to differentiate the sections. From the sound, the intention, at least, was that the "red border to the Tenderfoot (Promise) Badge" should be an enamelled part of the badge:
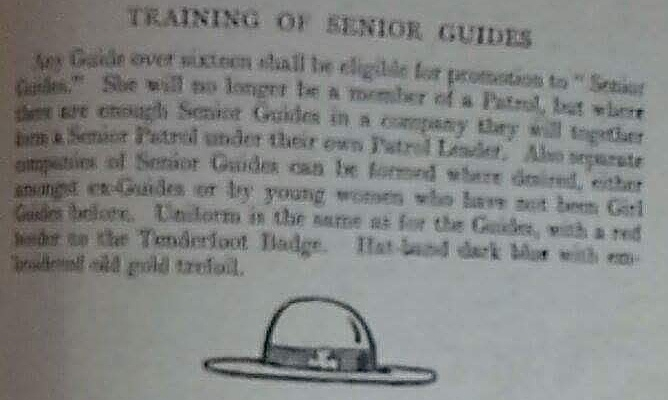
Interesting to note, also, that the Senior Guides were meant to wear a hatband with only an "embroidered old gold trefoil". You can see that the newer girls in the above photo have this. The more experienced Guides have carried over their old BP@ GG design band from younger years.
I've also now spotted that Captain has her green-enamelled warrant badge on the knot of her tie, and with seven years' service, she is also wearing the Tenderfoot Badge from 1910-12, with an inverted (to our eyes) scroll on the trefoil.
 1910-12 design Tenderfoot Badge
I've included a pic of this original design (left), as shown in "How Girls Can Help to Build Up the Empire", so you can see what I mean.
But I am digressing, somewhat, into details which aren't entirely relevant to my uniform. Suffice to say that these are Senior Guides (or Rangers), and I don't need to worry about it!
The evening was spent setting up for embroidery. I needed to make several templates to cover all of the different types and sizes of sewn badge. Being a good Girl Guide, I used a packaging box:
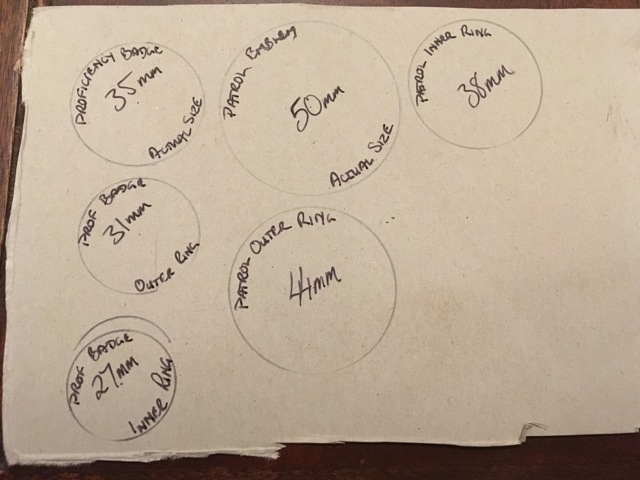
The diameter of the proficiency badges, I took from a period example in my own collection, confirmed by measurements in the "Consolidated Catalogue". Patrol badges, I was told by collector Alan Shrives, varied from 40-55mm. I settled on 50mm, as being closest to what I'd seen in photographs.
The other, smaller discs, represent the measurements of the embroidered rings on the badges.
11th September 2016 - Badges begun
A busy weekend, but I managed to begin my embroidery this evening, using the threads I'd found. First was the Sick Nurse Badge on its red melton backing. I used some crochet yarn I found in my cupboard, which most closely resembles originals I've handled in the NSW/ACT Collection.
 1918 Sick Nurse Badge replica, still on the canvas.
This was followed by the Cyclist proficiency badge, on the white wool felt, and using the navy blue sock darning yarn I inherited from my grandfather. It feels a little bit dark, now that I've used it, but I've seen a mix of fibres used in these historic, hand-sewn badges, and I've also seen a fair bit of colour variation, so I think I'll keep it. Might have to catch down the spokes a little bit to stop them wandering and catching on things.
 Replica 1918 Cyclist badge.
13th September 2016 - Not the right stuff.
This evening I made my first attempt at the 1918 Second Class Badge, and I wasn't impressed. I bought a cheap packet of matching crochet yarn in a shop, and it's just too rough. Set beside the original, which had faded with time (but not on the back), it pulled the fabric too much, was difficult to work, and simply looks coarse. I'll have to find something better.
I also realised the sides of my cloth were puckering, so decided to lace up the sides of the frame with spare crochet yarn. You can see how I've done it in the picture below.
 My replica 1918 Second Class looks very rough, next to the original.
 How to lace the sides of your fabric and stop puckering.It doesn't have to be pretty.
14th September 2016 - All about flags.
On Wednesdays, I try to get out of the house, away from the kids, and be a little bit social, so I don't like to miss my time with the Portland Community Quilters.
Fortunately, with a flag to make, I didn't need to!
About 4.5 hours of my day was spent taking the Union jack in the corner of our Unit's old Australian Flag, and sizing it up to full size for a new Parade pole.
 Notes on a Union Jack pattern
The end result was a usable full-size pattern, some blue cotton/linen blend fabric (thanks ladies!), and a clear idea of what I needed to be finding for the red and the white.
Being the conscientious Guide that I am, I also didn't want my Australian flag to be trailing on the ground as I worked, so I colonised the Quilters' cutting table for the day:
 From Notebook to cardboard pattern, with the original flag underneath.
After picking children up from school, I dragged Husband out to Masters hardware, to find the bits for the actual pole. More on that later.
I was pleasantly surprised to discover, while poking around on Pinterest in the passenger seat, that the pole topper given to me by my District when we retired a pole last year, is actually taken off the mold of an original British 1920s design. The only difference is that ours has lost a bit of detail in the re-casting (the method was switched to sand casting at some stage - something I learned while working with my husband on bronze-cast accessories for my costumes), and the rounded edges of the trefoil leaves have been ground back to a slightly more "Colonial profile".
What I mean by "Colonial Profile" is that many Promise Badges of the former British Empire,were designed with a slightly more flattened end to the trefoil leaves. Strange, but true...
 1920s Sea Ranger pole topper.
 1920s Australian flag pole finial with flattened edges.
Oh, and in other news, my Bosun's Whistle has arrived from India! I ordered it last week for all of $5 on eBay. Perfect for the Patrol Leader of 1918 ("The Patrol System for Girl Guides" 1918)
 Bosun's Whistles were the original Girl Guide Patrol Leader's whistles. This one cost me all of $5!
Bibliography:
Baden-Powell, Agnes and Robert Stephenson Smyth Baden-Powell Baden-Powell of Gilwell. 1912. The Handbook For Girl Guides, Or, How Girls Can Help Build The Empire. London: T. Nelson.
Baden-Powell of Gilwell, Robert Stephenson Smyth Baden-Powell. 1918. Girl Guiding. London: C. Arthur Pearson Ltd.
Newell, Thelma Elizabeth and Tony Newell. 2010. The Consolidated Catalogue And List Of UK And British Empire Girl Guide Badges - Centennial Issue. Launceston, United Kingdom: Thelma & Tony Newell.
Policy Organisation And Rules. 1921. London: The Girl Guides Association.
Policy Organisation And Rules. 1926. 3rd ed. London: The Girl Guides Association.
http://www.tudorlinks.com/treasury/freepatterns/w191214cdgoreskirt.html (accessed 6/9/16)
https://witness2fashion.wordpress.com/category/uniforms-and-work-clothes/page/2/ (accessed 6/9/16)
https://au.pinterest.com/pin/2111131056030781/ (accessed 6/9/16)
Acknowledgements:
Leslie Smith of Leslie's Guiding History Site
Elizabeth Adams for her hours of trawling Trove for interesting articles and references.
Alan Shrives, for the beautiful pic of the BP @ GG Hatband.
Amanda Kerr-Munslow for listening to my ravings about re-creating accurate Guide uniforms of the 1910s (she does it herself), and for sending me reams of useful things.
The many, many members, collectors and British Archivists of the I Love Girlguiding History page on Facebook, who answered all the questions and found all the references I couldn't find in Australia.
3rd Lithgow Girl Guides, my own District, for giving me the old pole-topper and stitched flag to help complete this project.
Karl Cook, my loving husband, for putting up with me, for listening, for believing in me, and for fixing and making metal and wooden things I'm not so skilled at (namely pole-topper, badges, parade pole, belt buckle, and more besides!).
Return from 1918 Girl Guide Uniform, to Costume Replicas
Return from 1918 Girl Guide Uniform, to Homemade Costumes from History.
New! Comments
Have your say about what you just read! Leave me a comment in the box below.